Since we have so many friends that have gotten chickens over the last few years I thought I would share a bit about our flock, let you know some of the tricks and pitfalls we have found over the years and finally to share some “egg heavy” recipes with you all since if you are like us you are always looking for something new to do with your poultry largesse! I hope that some of you might be inspired to share some of your favorites in the comments below as well.
Our chicken adventure started in the fall of 2005 when we finally realized that we would be staying in AL. We ordered up 5 Silver Laced Wyandottes, 5 Golden Laced Wyandottes, 5 Silver Penciled Wyandottes, and 10 Ameraucaunas from Sandhill Preservation Center (
http://www.sandhillpreservation.com/). Our package of peeps arrived May 12
th 2006 and the fun began! Instead of 25 chicks they had thrown in a couple extras of unknown type.
 |
| The Chicks! |
Chelsea and I soon discovered the joys of chicken watching. It was great to come home and place your hand in the brooder and have all 27 chicks scramble to fit under your hand like they would under a hen. It did not take long to realize they all had distinct personalities. The sad part was knowing that since we had gotten a “straight run” (chicken breeder talk for unsexed chicks) that about half of these cute little fuzz balls were roosters and therefore destined for the stewpot. I will never forget the first time I took them all outside for the first time. They pecked around nervously for a bit then one dropped and started having what looked like a seizure! Then another one did then another then another! My first thought was, “Oh No! Did they eat something they shouldn’t have?” Then I quickly realized that they were all just enjoying their first dirt bath! Watching 27 young chickens rolling and kicking dirt everywhere is a sight! As they got bigger it was fun to let them loose in the yard and sit at the picnic table with a beer and watch them go running around looking for bugs, taking dust baths and establishing the pecking order of the flock.
 |
| The Coop and Run |
 |
| Young Cooper |
 |
| The flock out foraging |
That June, I tore down a garage in Opelika and used the bulk of the lumber to build a big chicken coop and covered run. They grew remarkably fast and as their adult plumage came in so did the tensions between the roosters. We had already named a few that were easy to tell apart: Cooper was by far the largest and looked rather hawk-like (hence Cooper…), one all black one was always curious and getting into stuff so it was named Trouble, it had a frequent partner in crime that was mostly black with some gray flecks hence it was named Double Trouble. As they got older and we could tell both the sexes apart better we gave most of the Ameraucaunas names since they all looked different enough. We added the names Friend, Sunflower, and Copper to our list of hens (in addition to Trouble and Double trouble). It became obvious though that the Wyandottes were almost impossible to tell apart either by plumage or personality. Therefore we ended up with the Brown Bettys (Golden Wyandottes), the Marges (Penciled Wyandottes) and the Naked Nancys (Silver Laced Wyandottes…more on how they got that name latter). The roosters did not get so lucky. Since we knew that all but one or two of them would be around long we decided to name them accordingly. We had Lunch, Dinner, Freezer (he was almost all white…what else should he have been named? Mr. Freeze was a thought too), then there was Rocky (always wanting to fight), Bruce (a handsome and friendly Wyandotte) and of course big ol’ Cooper ended up being a rooster too.
 |
| Cooper (L) and Bruce (R) squaring off |
Soon there was fighting and once the roosters started “servicing” the hens it became obvious that we needed to reduce the size of the flock fast! Turns out that having a bunch of cocks can wear the feathers right off the backs of the hens. The Naked Nancys seemed all too willing to oblige all the time so they were all bareback (I told you I would explain how they got that name!). So one day in the fall I got out the stump and hatchet and all the roosters except Cooper and Bruce met their end.
Of course they all had beautiful plumage and we have friends who tie fishing flys so I decided I would skin out the necks (hackles and cape) and backs (saddle) to dry and give away. The skinning was easy and I simply rubbed the flesh side with borax, stretched them on a board (feather side down), and nailed around the edges with some small brads. What was a pain in the ass was dry plucking them! Let me just tell you unless you really have a reason to keep the feathers save yourself some grief and scald them. Simply get a large pot of water and bring it up to about 150oF. After killing the bird and letting it bleed out, take it by the feet and dunk it into the hot water for just a few seconds. Move it up and down to make sure the water gets into the feathers then pull it out of the pot and dunk it in cold water. The feathers will practically fall off the body after this. Be careful you don’t want to cook the skin just scald it! After this it is your pretty standard gutting and cleaning job. The one thing that they don’t talk about in many of the books is how truly hard it is to get the lungs out. They are WAY up in there and my hands at least were too big to get up in there easily. If any of you need some directions on killing and cleaning this website is pretty good (
http://www.backyardchickens.com/t/109583/killing-plucking-eviscerating-cutting-up-your-chicken-graphic). Be forewarned if you are cooking ‘yard bird’ they are smaller and tougher than the grocery store counterparts, but tastier. Stews, soups, and anything in the crockpot is a better bet than attempting to bake, fry, or grill.
On Oct 12th 2006 we got our first egg (Silver Laced Wyandotte) so all the books were correct that it would take about 5 months for them to start laying! We started asking friends and co-workers to start saving egg cartons for us. Let me tell you right now it seems like you always either have tons of eggs and no cartons or tons of cartons and no eggs! At this point we were in the former category. By Nov 24th we were getting about 5 eggs a day from 18 hens and we also got our first green egg from an Ameraucauna (they will also lay light brown eggs, and it seems that they don’t switch…if a hen lays green ones she always lays green ones). By Nov 27th 2006 we were getting about 8 eggs a day. Soon after that when the cold weather and shorter days started egg laying slowed down until it got to where we might get one egg a every other day.
Egg laying started picking back up in mid Feb 2007. At this point we had a whole cabinet full of empty egg cartons stockpiled!
 |
| The chicks we hatched out |
May 8th 2008 hatched some of our own chicks (Wayandotte and Wyandotte/Ameraucauna mix, N=5) and on June 28th we added to our own brood (Michael). Michael, like all little kids loved the chickens. The only thing he did not like was when the roosters crowed. He would be playing near the pen and one of them would sound off and he would just freeze. Then the lower lip would start quivering and soon after that a “Whaaa” would start, quiet at first, and get louder and louder until Chelsea and I came to “rescue him”. Both the roosters were incredibly good with him. I still remember as a little guy getting pounced on by one of our roosters in NC. Despite the scimitar-like spurs that Bruce wore he never tried to spur any of us, but I always kept a watch on him whenever Michael started harassing “his” hens. Sawyer is also a big fan of the chickens and loves feeding them and chasing after them in the yard.
 |
| Michael feeding the hens |
 |
| Part of the fox carnage |
|
We have certainly had some predator issues as well. We lost one hen to an unknown avian predator in the first year. Since we have them in an enclosed run and usually only let them out when we are around we have been pretty lucky. We attempted to adopt a dog (two strays showed up at our house) and the day after getting her back from the vet and naming her she tore through the side of the isolation pen and ate poor Bruce (nothing left but some feathers and blood she even ate his giant spurs!). Needless to say the dog went to the humane society the next day… In August of 2011 I made the mistake of not locking the chickens in at night again (it has happened quite a few times). I was awoken at about 4:30 am to the sound of panicked squawking right outside our bedroom window. It was just light enough to see and I jumped out of bed and looked out the window to see a grey fox running after several hens in the front yard. Probably the same fox that had been raiding the garden eating cantaloupes and watermelons! I ran to the safe and clumsily opened it, got out my 16 ga. shotgun and grabbed a couple shells. I put on my rubber boots (only other thing I had on was boxers…I’m sure I looked the epitome of Alabama fashion!) and ran around the side of the house. There went the fox with a flapping hen in her jaws. Determined to get some retribution as I heard the dying hen and fox fading into the woods I chambered a shell only to realize I had grabbed 20 ga. shells instead of 16 ga. I trailed her to her den where I had seen her and three kits months before. It was then that I realized my anger was misplaced. Mrs. Fox was just doing what is in her nature and I was the one at fault by leaving the birds out. She had killed four hens and injured one other and Cooper who was defending his ladies. Since then I have been extra careful to lock them up at night and also to appreciate the “talents” of the local wildlife.
While I can stand the loss of an occasional egg to a possum or gray rat snake, we have had a couple issues with the invertebrate pests. We have survived infestations of both feather mites and scaly leg (another type of mite). Both seem to strike during winter especially after prolonged wet periods.
Feather mites- The feather mites must have gone undetected for a while because by the time I noticed the egg masses on the feather shafts of one hen I checked and they all had it. The egg masses look like big bits of popcorn stuck on the shafts of the down feathers. It usually mostly around the vent and abdomen. After consulting several books and websites I finally decided the best treatment was to dust them with an insecticide like Sevin. The problem was how to do it since you really had to work it up and into the feathers to be effective. I had built sliding closures on the coop so I waited until after dark and locked all the hens inside, the fun would begin in the morning. What I decided to do was take a big garbage bag and cut off one bottom corner. I shook in a liberal amount of Sevin and was ready to go. I grabbed the first hen and poked her head through the hole in the bag then I held her feet and closed the bag up. I shook the bag (not the chicken!) and tried to fluff and work the dust into her feathers through the bag as best as I could. I pulled her out, released her out the door of the coop and grabbed the next hen. In all it only took about 20 minutes to do all the hens and the two roosters. They all seemed no worse for wear and we never have had any problems with feather mites since. I should also mention at this point I bought a bunch of food grade diatomaceous earth and I sprinkle it around the coop and nest boxes whenever I change the litter.
The other issue was scaly leg, also a type of mite that infects the scales on the legs. Again I did not notice until most of them had it and some fairly severe. The mites lay eggs on the scales which causes the scales to “puff up”. Their legs look like someone put a layer of white spray foam insulation on them. Most of the older books I had had various concoctions of really nasty stuff to mix up and apply. On a lark I went to the old feed and seed in Tuskegee and asked there. The old fellow that ran the place said he was not sure what to do but after looking around a bit he pulled down a dusty jar of Sulfur Ointment. I figured I didn’t have anything to lose and the ingredients were mostly petroleum jelly and camphor. Again I waited until dark then donning a headlamp removed the hens one by one and slathered their legs with this stinky goo. I did this for two nights in a row and within a week the crusty scaly stuff was falling off and their legs were healing up. I assume it mostly works by suffocating the little buggers. We had one more outbreak this past year but I caught it earlier (it seemed to affect the older hens more than the young ones). I treated all of them just as a precaution and again they healed up quickly.
 |
| Sawyer visiting the chickens |
So besides the entertainment value I decided it would be fun to sit down and do a back of the envelope calculation as to how many pounds of eggs we have gotten out of our little flock over the last 5 years. On average our eggs are in the Large to Extra large category so I figure they are about 2.25 oz each (according to our antique egg scale). On average we have gotten about 8 eggs per day and I figure they lay about 270 days out of the year. We have had them for 5 years now so…2.25 oz per egg x 8 eggs per day x 270 days of laying per year all divided by 16 oz/per lb=1518.75 lbs of eggs! Wow!
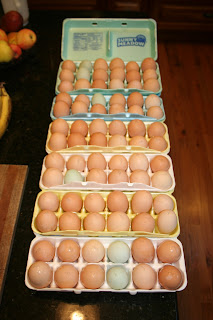 |
| One week of hen output! |
So what to do with all those eggs? Here are two of my favorite “egg heavy” recipes. I hope that they work well for you and that you will share back some of your favorites.
6 egg Quiche
There are four parts to the quiche I make: the shell, the cheese, the filling, and the custard
Shell-Bake pie shell either from scratch or use frozen (what I do!). While shell is baking prepare fillings and custard.
Cheese-I like either shredded swiss or shredded sharp cheddar (you will need about 1/2 lb.). Which kind is up to you but I generally like the swiss with the ham/spinach and the cheddar with the bacon/broccoli.
 |
| The shell with filling |
Filling-my favorites are chunks of ham (~ ½ lb) or bacon (~6 slices) with broccoli or spinach (~ ½ to ¾ pound). The veggies can be frozen. Just thaw and drain all the water you can out of them. I cook the bacon or ham chunks then add the broccoli/spinach in the last few minutes of cooking to warm it up.
 |
| Shell+Filling+Custard before baking |
Custard-beat together 6 eggs then add milk to bring the total volume up to 3 cups (HINT: if you have any heavy cream or just a bit of sour cream or cream cheese left in a container add it for extra yumminess, plus it is a great way to help clear out the fridge!). Add about ¼ tsp of dry mustard and any fresh or dried herbs you might have (I like thyme, marjoram, sage and oregano). For the ham and spinach combo I like to add a dash or two of nutmeg.
Once your shell is cooked pull it out of the oven and add most of your cheese to the bottom. This melts it and helps keep the crust from getting too soggy. Add the filling and put the rest of the cheese on top. Pour the custard over the top until everything is covered, sprinkle the top with paprika and pop it in the oven at 375oF for 40-45 minutes.
 |
| Done! |
4 egg Crepes-They consist of two parts the crepe and the fillings
First you will need a large (9-10” dia) cast iron skillet or griddle. I like to start heating my griddle while I make the batter. I put it on med heat. To make the crepe batter, get a large measuring cup (like 4 cup) and beat 4 eggs. Add ½ cup milk, ½ cup water, ½ tsp salt, 2 tbs melted butter (or vegetable oil) and 1 cup plain/all-purpose flour. Then using an immersion blender blend everything together (I guess you could put everything into a blender from the start too, but it is fun to use the immersion blender!). The batter will be very runny, this is OK! Once blended I let it sit for a few minutes while I check the temp of griddle and get it oiled.
 |
| Michael helping make crepes |
To make the crepes you will need a pot holder for your pan. Lift the griddle off the stove and pour some of the batter on the griddle and then immediately tilt it around to spread it out as big and thin as you can get it (8” dia is good). The batter will look “shiny” at first then turn dull. Once the whole surface is dull you can lift up a corner and flip it over. Cook it for a minute or so on the other side then lift it off and lay it on a plate. The crepes don’t have to be brown and they will be kind of rubbery feeling (again this is OK and what you want). You can only make one at a time so it can take a while to make a batch (this recipe makes about a dozen 8” crepes).
 |
| Filling and rolling |
Filling-the best part of crepes is you can fill them with whatever you want. I usually do some combination of fresh fruit or jam or jelly and sour cream or yogurt or Nutella. My favorites are nutella and banana and sour cream and strawberry jam. The boys love picking out their toppings and rolling them up. Michael loves blueberries and Nutella, and Sawyer well…he likes anything he can stuff in his mouth!
 |
| Sawyer final quality control testing |
I hope Chelsea will include her directions for Gelato, Marshmallows and Chocolate Lava Cakes!
-R


